You are either finished with your skirt or about to be finished. If you have completed your skirt, meaning handsewing the small opening and top stitching along the entire edge of the skirt, then your skirt is complete.
If you haven't completed the final two steps - by hand sewing the opening and top stitching, then please have that done and ready to be turned in next week. That is the "homework" for the week - having a completed skirt.
Let's move on to the shirt. Please bring fabric that you want to use for the shirt. It doesn't have to match the skirt, but it would make a nice set if the two fabrics matched. It needs to be washed and pressed so we can lay out the pattern and cut it out in class this Tuesday.
I gave everyone a template, printed on card stock, to be used in the construction of the shirt. That will help make the project go faster. Each project we do this year will have some new technique in it, even if the pattern instructions have to be changed to make it more of a learning experience.
Let's review what was learned by making the skirt:
1. Choosing fabric for the project. Okay, that wasn't hard because everyone used cotton but we learned that you don't use a large printed fabric when making doll clothes.
2. Using simple fractions. We discussed how much fabric was needed and how many inches to cut off the larger pieces of fabric we had to choose from. Remember the trick when doing the "nine times table"?
3. Fold, selvage, and grain line - enough said :o)
4. How to use a pattern: You learned how to lay a pattern out on your fabric, how to pin it on the fabric, and how to transfer markings from the pattern to the fabric.
5. Sewing on Velcro: You all did a great job working with Velcro for the first time.
6. Construction: You learned how to effectively pin the two pieces together, sewing them, backstitching like pros and how to pivot neatly on the corners.
7. Technique: How about all the clipping and trimming? Using a point turner on the four corners? Great job!
8. Using the iron: It took patience to get the skirt turned and ironed. Because of the two different fabrics, it seemed harder to accomplish getting a neat edge because it truly was harder.
9. Fixing mistakes: Everyone had at least one issue and no project had to be "scrapped" because of a mistake. You all took your mishaps and turned them into successes. I appreciate all the patience you showed when ripping out seams, redoing portions of the project, dealing with glitches, etc.
10. Hand sewing: You all practiced the stitch that was used to close the opening left from turning the skirt - the whipstitch or sometimes called an overhand stitch. The instructions didn't use this method to close the opening, but in order to learn a new technique, we made that change. When you make a second or third skirt, go ahead and follow the pattern's instructions - you deserve to skip that step, if you like.
11. Topstitching: The final step. Here again, the instructions didn't call for topstitching the entire skirt but don't you think it looks much nicer that way? I wouldn't skip this step if you decide to make more skirts - it is a simple step that makes the project look great. You all used hand/eye coordination as you carefully guided the skirt along the edge of the presser foot.
12. Learning to adapt: We used some fabric glue to help hold down the Velcro, some used Velcro circles, rather than strips, like the pattern called for. We ended up having other little things that caused us to adapt - that is the name of the game - and you all did a great job "going with the flow".
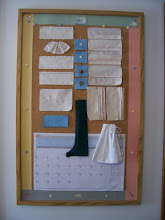
Wow! Take a look at that, one little doll skirt taught you a lot. Some of your "learned" techniques are hidden, only we know the true work you put into these simple skirts :o)
The question is: do you have time to make some skirts to donate to Toys for Tots before the deadline to donate has passed? That depends on your school and family schedule. I will check into the dates for local charities and see what kind of time allowances there are.
We do need at least one skirt, per girl, to display at TEACH Night this coming spring. We will also display other items along with the skirts and notebooks.
Recap for Tuesday:
~ ~ ~ Bring your completed skirt to class to be checked.
~ ~ ~ Bring fabric for the shirt, prepared and ready to use.
~ ~ ~ If you get a chance, practice the whipstitch on the muslin strips that you have sewn for this technique.. You need one that shows your best work. Don't make the stitches too close, about five stitches or so - per inch, is sufficient.
Thanks Girls!!
skip to main |
skip to sidebar


Bulletin board display of new techniques taught each week

Beginning sewing project

Sewing classes for the homeschooled student
Link to T.E.A.C.H.
Link to Homeschool Sports Program
Link to homeschool fine arts program
Sewing Vocabulary List
Click here to view current vocabulary words - new words added as we go through the semester.
Search This Site

~ ~ ~ About the teacher ~ ~ ~
I am the mother of five, currently homeschooling my last kid. I love sharing my desire to create - using various forms of textiles.
In addition to family and homeschooling, I run the Encore Homeschool Fine Arts groups. My husband and I serve on the TEACH Board of Directors with three other sets of homeschooling parents.
My philosophy is that anything worth doing, is worth doing well. I credit my love of sewing to my junior high sewing teacher and my grandmother. Their encouragement is what lead to a skill that has benefited me over many years. That is
what I hope to share with each student that comes my way.
Check out our family blog -
The Bachville Times
or my knitting blog -
Knitting on the Prairie.
Beginning Sewing

Bulletin board display of new techniques taught each week
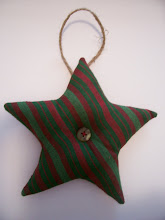
Padded Star

Beginning sewing project
